


Thursday, September 23, 2010
Etsy Success Holiday Boot Camp
I, Christine Wilson, pledge to participate in the Etsy Success Holiday Boot Camp to the best of my abilities. I vow to check in every week, do my homework and support my fellow Holiday Boot Campers. I will read the weekly newsletters and blog posts, check in on the weekly forum thread, read the weekly blog post, check off the checklists and salute the mascot. I promise to share what I've learned with those who need it, support my fellow Etsy indiepreneurs and, most of all, have a positive and persistent attitude. I understand that together we can spread the word about our handmade and vintage goods, making this holiday season a more unique and meaningful one to gift givers and give-ees everywhere!
Sunday, June 27, 2010
Spotlight on Polarity Collaborations Part V

I don't remember how I first stumbled across Cat Ivins' two shops (Polarity and Uncorked) but I was immediately drawn to her designs. One look at her shops and you'll see what I mean. Her attention to detail, the simple elegance of her designs and her unique packaging all make for an attractive showcase of talent. While working on this collaboration series, Cat pointed me to other artists when I was having difficulty finding them. Her blog, Olivebites, has often left me smiling, if not downright laughing, while keeping me informed at the same time. She's a true etsy success and was a featured artist in September, 2009. There's a beautiful interview with her on Etsy that I encourage you to read. It gives you insight into her art and her fabulous sense of humor, click here for that interview.
For this article, I chose to focus on her collaborations, which are many, and she agreed to share her experiences with you. I changed Cat's wording just slightly to improve the flow.

Collaborations
For my first collaborations, I chose a few sellers I knew from making treasuries, but now the artists usually find me. I try to work with artists whose work doesn't conflict with anyone I am already working with and whose work I love! We work together to select the images. They have an eye for what best represents their work and what has sold best for them in print. I consider the same things, but also look for what fills an open niche in my line up. I have a licensing contract which basically says I will pay them X amount for each sale and they can't license the images out to any other locket designers, but they can always make their own jewelry. The contract can be canceled by either of us at any time.
A good collaboration is made with a mutual respect between the artists and being very upfront about everything. I respect their amazing illustrations and the huge part that plays in the sale of the locket and they respect my design and physical labor that also plays a huge part. For promotions, I have done quite a few giveaways on various blogs with the artist lockets; sometimes a specific artist and sometimes giving the winner a choice of locket. Three of my artist lockets are currently in the Uncommon Goods catalog.
My favorite part of the collaboration process is the early stages; although that is also the part that takes the most time and I tend to procrastinate it when busy. I work with over 60 artists so there are lots of challenges! I am also about to do tradeshows with many of these lockets on my linesheets for the first time (in August) so I am expecting various issues will arise when we move the sales off Etsy.
Artist's seeking collaborations should work with people they like and respect. Set everything out, up front and very clearly. I would definitely recommend all sorts of collaborations; whether it be with your actual work, using each other's items in your photos, business card exchanges for customers, etc. I recently had a newish Etsy seller named FlowerBomber send me a few seedballs to send out with my orders along with his business card. There are many ways to collaborate with each other!

The mosaic above are shots of Cat's home work studio. I'm secretly hoping that my studio space will look as inviting some day. I should say, a fantasy of mine, as I have no hope of achieving this without an intervention of some sort. Her work space is as artistic as her designs and the organization is a necessity.
I've had a few people ask me how I approached the collaborations I've done recently. I did not have an organized approach, I went were the inspiration struck me as I was working on this series and I kept them very simple. Cat brings up several interesting ideas for approaching collaborations. They do not need to be complex; start with a business card promotion with artists you know and whose work compliments your own.
I have one last interview in the pipeline for this series as well as another of my own collaborations to show (just waiting for those beads to come in to finish it off). If you'd like to learn more about Cat Ivins, you can find her on the following sites:
Blog = Olive Bites
Twitter = UncorkedEducation
Facebook = Cat Ivins
Monday, June 14, 2010
Spotlight on HouseofCats Collaboration Part IV

Today continues my collaboration series as we talk with Bill, owner of House of Six Cats. Imagine my surprise when I found he hails from Oregon, one of my favorite places. The Japanese garden pictured in his original print above was a favorite weekend destination of my husband and I during our brief time living in the Portland area. It is my great pleasure to share Bill's profile with you and his thoughts on collaborations and what makes them work.
The Beginning
My love for photography started when I got my first 35mm camera for my 16th birthday. It was a minolta X700, and I still have it! Fast forward twenty-seven years; that includes a burn out with a ten year hiatus from shooting, three cross country moves, a marriage and birth of our daughter.
It was the birth of our daughter that reignited my passion for photography, that's why she is my shop's avatar [picture that appears on all shop communications]. Because of my renewed love for photography, I finally decided to try to sell my art. I opened my Etsy shop in June of 2007, and quickly became the leader of the then dormant POE (Photographers of Etsy), street team. Now it is the biggest team on Etsy and is approaching 2000 members!
Over the past three years, I have developed a knack of finding unique and functional ways of using my images. Some of these ideas have been more successful than others. I currently offer ceramic art coasters, night lights and jewelry, as well as prints. With the coasters and night lights, I also offer collaborations with other Etsy artisans.

Beside Etsy, I do local craft and art shows. I am in six local Portland shops including a gallery, and I am also in a new, Wichita, Kansas shop that just opened!

I love how these artists work together building on each others' strengths. For example, House of Six Cats offers five incredible ways to enjoying his art: print, pendant, coaster, locket, and night light. Four of these offerings are his own creation, but the locket was a collaboration with another shop, Polarity.
Bill was gracious enough to provide advice to others seeking collaborations. I've edited his replies only enough to place them in conversational form. I asked him to describe how his collaborations formed, what he enjoyed best, what posed a challenge and advice he might give to readers in forming their own.
Collaborations

Initially, I formed collaborations by contacting members on the POE Team list that I had some contact with in the past. Now, people come to me asking to collaborate. I'm always open for new artists who are interested in a collaboration. Either with me and their art, or my art and their creations.
For my collaborations, artists typically give me permission to use their images for the coasters. I can sell them in my shop and they can also sell them in their shop. There have also been times where I have made direct off Etsy sales to friends and family members. For each sale the collaborative artists make a percentage, and we both sign a simple agreement. In addition to the listing, I utilize social networking sites (Facebook, Twitter, etc.) to promote each new listing or new sale.
I truly enjoy getting sales from the collaborative shops! It's exciting and rewarding. The only downside to the process is seeing artists that don't get any sales from the collaboration, that is always a bummer.
When forming your own collaboration, if possible, work with shops that you have a relationship with, or fellow etsians they know. Second, make sure they write up a simple contract/agreement to help protect both yourself and the artists you collaborate with. Third, use your common sense and don't collaborate with someone you don't feel comfortable with.
The biggest joy I've discovered in my new on-line presence is the wealth of learning and sharing that occurs within this community. As a final note, Bill is generously giving away a set of coasters, you can find out more at Bee's Go Buzz, and take advantage of an excellent opportunity to enjoy one of his creations. You can also learn more about this incredible artist at the following sites:
Facebook Fan Page
Facebook Personal Page
RedBubble
Etsy
Twitter @houseofsixcats
Flickr
Wednesday, June 9, 2010
EBW Monthly Challenge

It's time once again to vote in the Etsy Beadweavers' monthly challenge. The theme this month was phenomenon and there are many fantastic entries for you to enjoy. My entry is in honor of Mt. St. Helene's. I was not there when it erupted, but moved to the area over 10 years later. The stories of those who survived and those who did not, the landscape, and it's dark beauty left a lasting impression.

To place your vote, go the the team blog:
Wednesday, June 2, 2010
Work in Process Part 2
I thought I'd share a couple more pictures with you of my Barrel of Monkey's collaboration. It's coming along nicely, with only a few "tear outs" and "start overs". It is freeform, like my first cuff.

I did tear out the blue surround I had originally placed along the outside edge of the pin. I found it interferred with the flow of beading, although I've come to regret that decision as it did provide a nice termination for the the beadwork. I'm basically following the lines of the fabric with some modification to add interest and movement.

You can see that I could not resist adding fringe around the pin. In my defense (although there really is none) I was seeing a gap when I bent the bracelet around my wrist (where I had removed the blue surround). I wanted to know if the fringe would cover that gap. Of course it did (I knew it would but needed the excuse to fringe away). I love the fringe and it would look spectacular on a pendant, I'll have to hunt down more of the teardrop shaped beads. Unfortunately the fringe does make beading in the immediate area difficult, so avoid adding fringe until you're finished with the beading in the immediate area of your focal (do as I say, not as I do).
You can also see I've added eyelets to the outside edge. I'm going to use ultra-suede lace for this bracelet's closure. Not only does it add to the whimsy, it allows for some flexibility in sizing. I'm on the hunt for a cinch button. I have a couple that will work, but I'm still looking for the perfect one.
I have a long way to go, but it's a fun project and definitely outside of my normal beading. These are becoming addictive and I have plans for at least three more.
Wednesday, May 26, 2010
Collaboration Work In Progress
I'm pleased to tell you I have three more follow-up interviews coming in the Collaboration series. While those are percolating, I thought I'd attempt my first "work in progress" posting. I love it when artists post these and I am woefully bad at doing it myself. When I'm caught in the frenzy of making something, I rarely stop to get out the camera and take pictures.
What better place to start, than with my collaboration with Jill, from Barrel of Monkeys. My inspiration for approaching Jill for permission to use one of her buttons in my design actually came from my Mother-in-Law, Judy. Judy (and her husband Earl) is one of my main sources for bottle caps and one day she handed me these three pins from Bell's Brewery knowing my love for reusing stuff.

Although it was screaming to be a pendant, I decided I'd made enough of those recently and I screamed back, you are a cuff, you are a cuff. I like to try new techniques so rather than a brass cuff, I'm going for a softer foundation. I found a fusible Peltex at Joann Fabrics that has the right weight to it (Note: you can get this as fusible on both sides, one side, or nonfusible). There are many materials you can use as a foundation for bead embroidery which may be a good series for another post (always thinking ahead).

To prep the piece, I first ironed the fabric to the fusible side of the Peltex and then glued the button to the center. Allow it to dry for several hours.

The next step is bezeling the centerpiece. This is both decorative and functional as it holds the button securely in place (never rely on glue alone). Usually I would embellished the bezel next, but I learned from experience that I need to do the surrounding beading first so whatever embellishment I choose doesn't get in the way (plus I haven't decided yet what to do).

The last step is a decorative surround which can also be used as a foundation for further embellishment or left alone. You can also see I've added guide lines, this keeps me from stitching too close to the edge, I'll need some room for attaching a backing.
The easy part is done and now I'm stuck. My original thought was corkscrew fringe all around the bezel, however, that may be too wild and too delicate for a cuff. I need to decide whether I'm going to follow the lines of the fabric, whether I'm going to add other stones, and what I'm going to do as a closure. My first instinct is not to include other stones or keep them to a minimum and focus instead on creating patterns and textures with seed beads. I'm really going to try not to embellish the focal point until the end (embellishing is my favorite thing, but I need restraint here).
I'll do my best to take pictures at each step that I can share with you as I finish this piece. As always, your suggestions and comments are most welcome.
Saturday, May 22, 2010
Featuring LilaRubyKing and Artmind
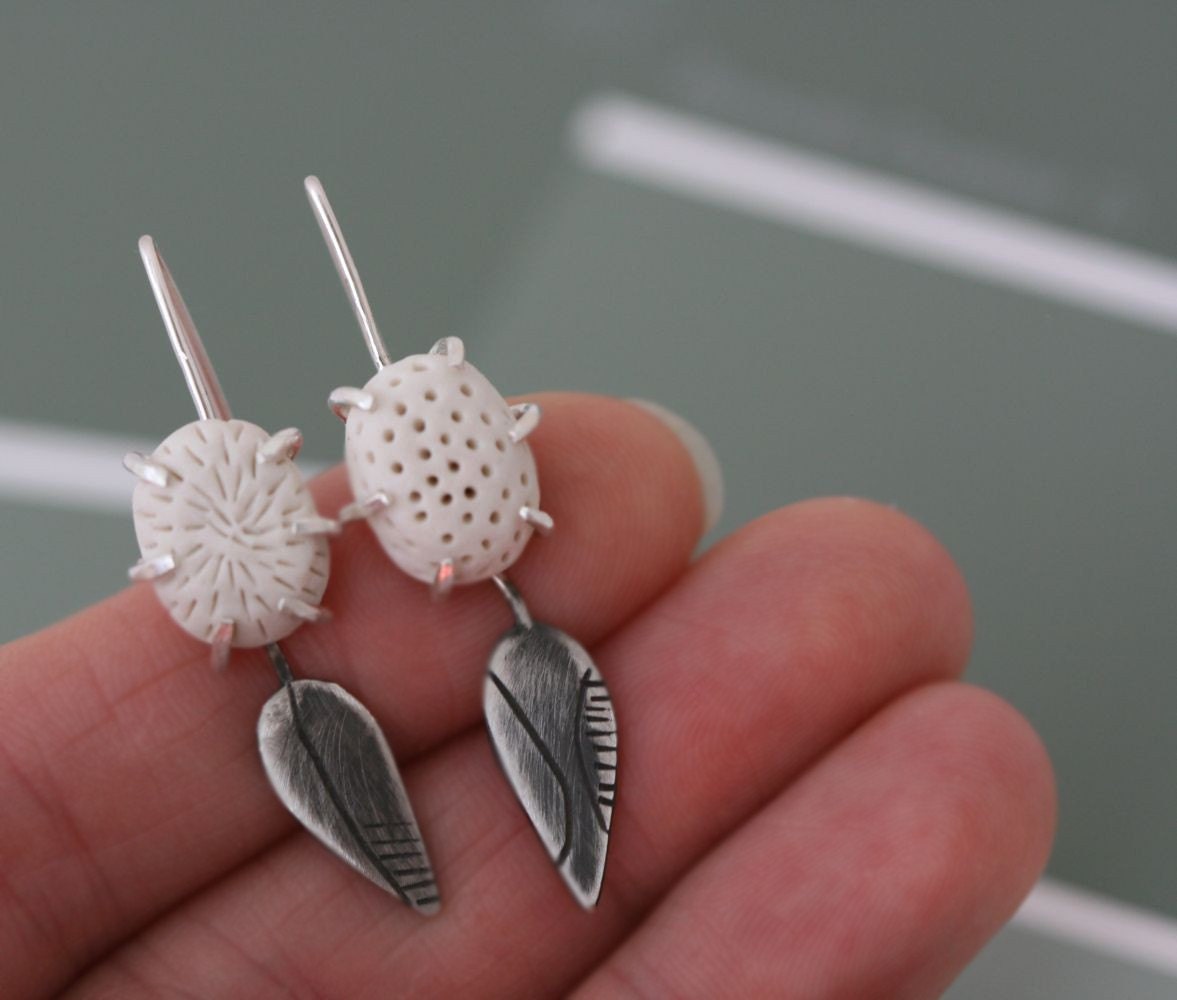
Today, I'm excited to present the collaboration between Anna's shop, Lilarubyking, and Misty's, Artmind. I came across both of these artists while searching Etsy for collaborations. The following interview is from a press release prepared by Misty for just such an occasion. Not only will you learn a bit about how their relationship began, it may just send you out to form your own. Their story is inspirational and demonstrates that there are no limits if you are willing to explore the possibilities.
Around the middle of 2009 I was thinking how much I would like to have a go making jewelery using porcelain which I had just begun experimenting with. I had no idea where to start and thought I would ask my friend and jewelery designer, Anna from LilaRubyKing if she would possibly, maybe, perhaps, one day be interested in collaborating with me. Anna and I had become Etsy friends through the European Street Team, and many conversations discussing printed envelopes, our mutual affection for crackle glaze, and trying to work out if our paths ever crossed in Perth in 2001. Anna was super keen and the planning began!

Interesting fact: Anna lives in Greece and I live in Belgium. We have never actually met but are living proof that collaborating over the internet is as easy as living next door. It feels like you have a co-worker even though you never actually see each other. It's great to exchanges ideas and to inspire each other.
It started off in a chat room on Etsy. Anna made some visual aids. Soon ideas began to flow. We decided to keep our collaboration secret and I started referring to it as ‘the secret project on my blog’. I started making samples in my studio, showed pictures and shared processes in my blog. It was a way for us to work out ideas while trying to pique people’s interest. And it was great to see people were intrigued by the all that we showed, giving us great feedback. Since we both love textures and nature, it showed in the prototypes.
After a few months and trying out some bits and bobs on both sides, we set a date on which we would list our first items. The balance of who does what was never really a subject. Anna takes the pictures, lists, wraps and ships the items. I take care of promotion, writing about the collaboration in my blog, and sending off the occasional blog submission.
All in all, we ‘met’ twice in a chatroom and chat via e-mail every day. Exchanging ideas, blabbering about our cats and partners or doing more serious stuff like discussing pricing. We calculate our price based on time, material and artist value and we each get our share of that. Very fair! It's a collaboration based on respect for each others work and for our friendship that developed throughout.
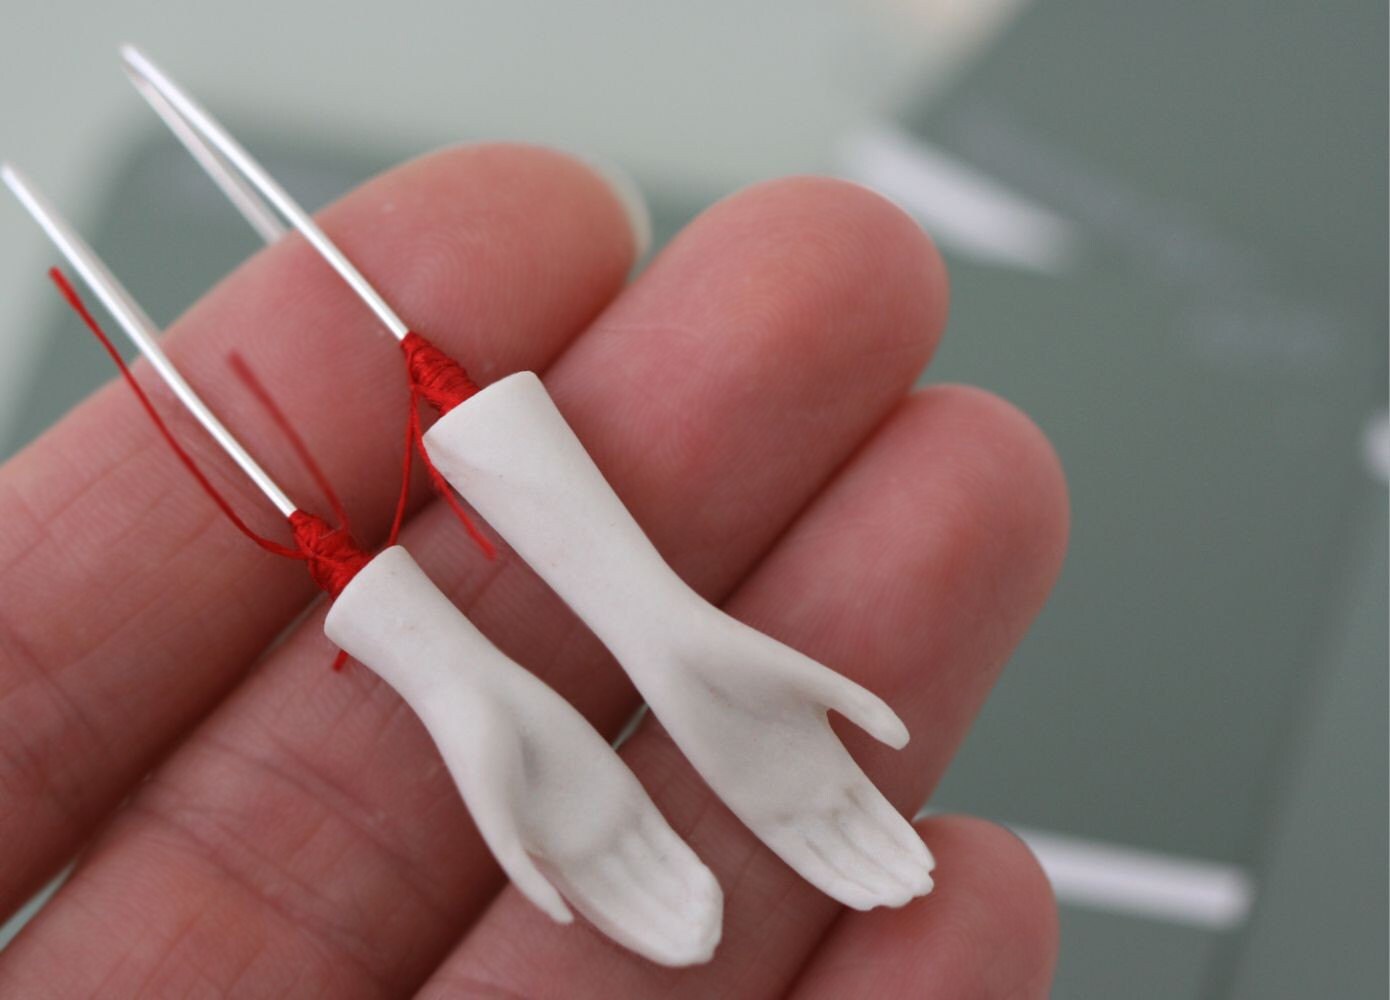
Exchanging ideas is super exciting and gives you a boost. It’s like wanting to dig into the clay right away or putting together jewelery when the mailman brings a box of goodies. Anna comes up with the most unusual ideas and makes me do stuff that I hate, like molding Barbie hands (not again!) but that makes it all fab and fun. The advantage for both of us is that it doesn’t feel like you’re working on an island. It generates energy and makes you try things that you never thought off before. It’s opening up new doors to new adventures and it’s all super exciting. The combination of porcelain and silver is not shocking or new but putting ideas on each other’s plate is a challenge.
I'm honored that you've taken this journey with me. In the upcoming weeks I'll bring you more features as we continue to explore this series. If you'd like to learn more about Anna, Misty or the European street team, please visit their links below:
ArtMind Blog
ArtMind Shop
Lilarubyking Shop
European Street Team
Subscribe to:
Posts
(
Atom
)